Automating Pull Requests on Bitbucket with new Strapi Github releases
Automate Strapi PRs on Bitbucket: Get pullrequest:write token & store as repo variable. Use shell script with jq & curl to compare Strapi versions & create PR via Bitbucket API. Define pipeline & schedule. Script compares GitHub release to package.json & creates branch & PR if needed.

For one of our company projects, we utilize Strapi open-source headless CMS (strapi.io) as our backend. Regular releases are published on Strapi's Github repository, and to quickly assess whether these new releases are compatible with our backend customizations, we sought to automate the process of pull request creation. This would allow us to run tests and confirm that everything is functioning as expected, giving us peace of mind when upgrading Strapi to a newer version. Since we use Bitbucket for our project, we leveraged the power of a scheduled pipeline to check for new Strapi releases on the Github repository. If a new release is detected, a pull request is automatically created using the Bitbucket API.
To automate the creation of pull requests for Strapi updates we will cover the following steps:
- Generate an access token with the
pullrequest:writepermission in the Bitbucket repository. - Store the access token as a repository variable, for example:
BITBUCKET_API_TOKEN_STRAPI_RELEASE_BOT. - Write a shell script that compares the current and latest Strapi version, and creates a pull request if they differ, using the Bitbucket API and the access token.
- Define a custom pipeline in the
bitbucket-pipelines.ymlfile. - Test the pipeline with manual pipeline runs.
- Create a schedule for the custom pipeline.
Finally, we will examine some examples of pipeline runs and pull requests created by the script.
For the purposes of this blog post, it is assumed that you are somewhat familiar with the usage of shell scripting, as well as utilizing git, Bitbucket, and Bitbucket pipelines.
Let's get started ...
1. Generate a Bitbucket API access token
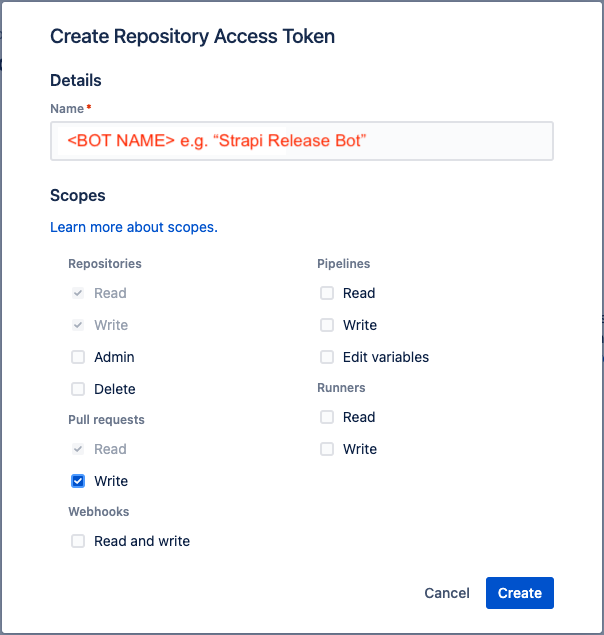
To generate a Bitbucket access token, navigate to the "Repository Settings" and under the "Security" section, click on "Access Tokens". Then, click on the "Create Repository Access Token" button in the upper right corner.
When you generate an access token in your Bitbucket repository, a modal window will appear (as shown in the screenshot below). In this window, you must specify a Name and Scopes for the token. Under "Pull Request", select "Write" for the Scope. The grayed-out checkboxes will then be automatically selected as shown in the screenshot.
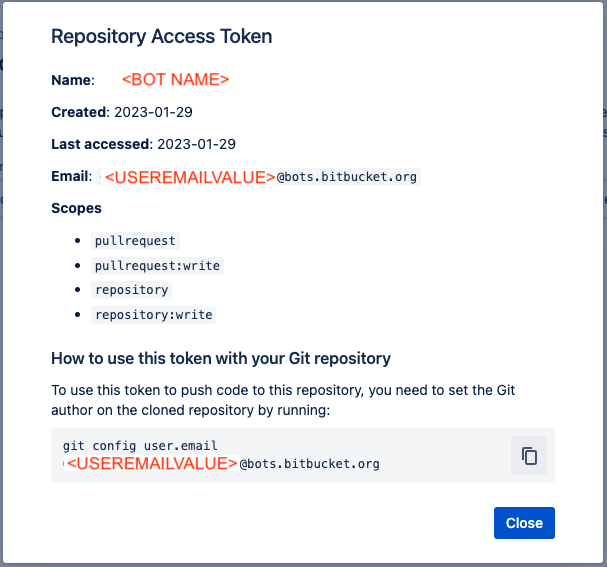
Once you have completed these steps, click the "Create" button and a new window will display your generated access token, along with some helpful usage instructions.
After you've created the token, you can view the git config settings for the user.email, which will need to be set in the script later on, see screenshot below:
2. Create a repository variable for the access token
The access token can be securely stored in a repository variable. This allows for easy retrieval as an environment variable during the Bitbucket pipeline runtime. To configure the repository variable, go to "Repository settings", then "Pipelines" and "Repository variables". Enter BITBUCKET_API_TOKEN_STRAPI_RELEASE_BOT as the "Name", and paste the previously created access token as the "Value". Ensure that the "Secured" checkbox is enabled and then click the "Add" button.

BITBUCKET_API_TOKEN_STRAPI_RELEASE_BOT3. Create the shell script
Now, let's create the shell script to automate the comparison of Strapi versions and the creation of a pull request within the Bitbucket pipeline. This script can be found in the following location within our Bitbucket repository: /scripts/create-pr-for-strapi-release.sh and its content is shown below:
jq and curl binaries available, or install them prior to executing the shell script.In brief this script sets variables for the GitHub repository and Bitbucket repository, and then fetches the latest release from the GitHub repository and the current release from the Strapi package.json file. If the current release is different from the latest release, the script creates a branch with a name in the format of bot/strapi-update-to-X.X.X and creates a pull request using the Bitbucket API.
Let's examine certain key elements of the script in further detail:
Script variable values you need to REPLACE
The script above has several values that require modification to suit your specific needs. Most of these values have accompanying comments marked with REPLACE. Here is a summary of these values:
# If you used another Bitbucket repository variable name
# you need to replace this value `BITBUCKET_API_TOKEN_STRAPI_RELEASE_BOT`
# with your environment variable name => search and replace

# REPLACE the location of your package.json file:
declare -r strapiPackageJsonFile="backend/${strapiPackageJsonFileName}"

# REPLACE: <bitbucketGitConfigUserEmail> with value generated
# by the access token creation earlier.
# This variable is used to set user.email:
# `git config user.email "${bitbucketGitConfigUserEmail}@bots.bitbucket.org"`
declare -r bitbucketGitConfigUserEmail="<bitbucketGitConfigUserEmail>"

# REPLACE: <workspace> and <repo_slug>
declare -r bitbucketRepoApi="https://api.bitbucket.org/2.0/repositories/<workspace>/<repo_slug>"

# Change source branch to checkout
declare -r sourceBranch="develop"

# Change target branch for the pull request
declare -r targetBranch="${sourceBranch}"

# REPLACE the path to your package.json file
strapiCurrentRelease=$(jq -r '.dependencies."@strapi/strapi"' "../${strapiPackageJsonFile}")

# Change directory to root of repo (you may REPLACE or even REMOVE this cd command as well depending on your scripts location)
cd "${scriptFolderPath}/.."

# Optional: Change the branchName for the code changes
branchName="bot/strapi-update-to-${strapiLatestRelease}"
Highlighted code snippets
Here latest version of Strapi is obtained from Github using the jq tool to parse the JSON response and extract the tag_name information:
# Fetch new release on GitHub repository
strapiLatestRelease=$(
  set -o pipefail
  curl --silent "${githubRepoApi}/releases/latest" | jq -r '.tag_name'
)
To obtain the current Strapi release present in the repository, we also utilize the jq tool:
# Get current release from Strapi `package.json`
strapiCurrentRelease=$(jq -r '.dependencies."@strapi/strapi"' "../${strapiPackageJsonFile}")
In this case, we employ a heredoc to store the POST payload for the Bitbucket API request, which creates a pull request.":
# Pull request POST payload for Bitbucket API request
payloadBitbucketPullRequest=$(
  cat <<EOFPayloadBitbucketPullRequest
{
  "title": "Update Strapi to version ${strapiLatestRelease}",
  "description": "This pull request has been automatically created by the \`$(basename "${0}")\` script using a pipeline schedule",
  "close_source_branch": true,
  "source": {
    "branch": {
      "name": "${branchName}"
    }
  },
  "destination": {
    "branch": {
      "name": "${targetBranch}"
    }
  }
}
EOFPayloadBitbucketPullRequest
)
The Bitbucket API POST request using curl:
  # Curl: Create a pull request (Bitbucket API) for the release branch
  if curlResponse=$(curl \
    --header "Authorization: Bearer ${BITBUCKET_API_TOKEN_STRAPI_RELEASE_BOT}" \
    --header 'Accept: application/json' \
    --header 'Content-Type: application/json' \
    --request POST \
    --data "${payloadBitbucketPullRequest}" \
    "${bitbucketRepoApi}/pullrequests"); then
    printf "Pull request created.\n"
  else
    printf "Failed to create pull request.\n"
  fi
Bitbucket API documentation for creating a pull request: https://developer.atlassian.com/cloud/bitbucket/rest/api-group-pullrequests/#api-repositories-workspace-repo-slug-pullrequests-post
To avoid duplication, we check for the existence of the branch before proceeding with creating a pull request. If the branch already exists, the script terminates:
  # Git: Check for existing update branch
  if gitLsRemoteResponse=$(git ls-remote --exit-code --head origin "${branchName}"); then
    printf 'Strapi update branch with name "%s" already exists.\n%s\n' "${branchName}" "${gitLsRemoteResponse}"
    exit 0
  fi
In this code snippet, the package.json file is updated with the latest Strapi version:
  # Determine & handle package.json updates
  updatedStrapiPackageJsonFile=$(STRAPI_LATEST_RELEASE="${strapiLatestRelease}" jq '.dependencies |= with_entries(if .key | startswith("@strapi/") then .value = env.STRAPI_LATEST_RELEASE else . end)' "${strapiPackageJsonFile}")
  # Also update the "app" version (optional, can be removed)
  updatedStrapiPackageJsonFile=$(
    set -o pipefail
    printf '%s' "${updatedStrapiPackageJsonFile}" | jq --arg version "${strapiLatestRelease}" '.version = $version'
  )
  # Override the original package.json with the updated content
  printf '%s' "${updatedStrapiPackageJsonFile}" >"${strapiPackageJsonFile}"
Testing the shell script
In the Bitbucket pipeline, the environment variable ${BITBUCKET_API_TOKEN_STRAPI_RELEASE_BOT} should be available for use.
If you plan to run the script outside of the pipeline, you can execute it as follows:
BITBUCKET_API_TOKEN_STRAPI_RELEASE_BOT=<API_TOKEN> ./create-pr-for-strapi-release.shThere is also a debug option:
SCRIPT_DEBUG=true BITBUCKET_API_TOKEN_STRAPI_RELEASE_BOT=<API_TOKEN> ./create-pr-for-strapi-release.sh4. Define the custom Bitbucket pipeline inside bitbucket-pipeline.yml
Now we will define a custom pipeline inside bitbucket-pipeline.yml file.
image: atlassian/default-image:4

pipelines:
  custom:
    create-pr-for-strapi-release:
      - step:
          name: '[Strapi release]: Create PR on new release'
          clone:
            depth: full
          runs-on:
            - 'self.hosted'
            - 'linux'
            - '62gb.gen8'
          script:
            - cd "scripts" && ./create-pr-for-strapi-release.sh
The custom pipeline named create-pr-for-strapi-release runs a shell script called create-pr-for-strapi-release.sh located in the scripts directory. The pipeline uses the atlassian/default-image:4 image.
The pipeline has a single step called '[Strapi release]: Create PR on new release', which clones the repository in full depth (important). The step runs on the Bitbucket self-hosted agent, labeled with linux, self.hosted and 62gb.gen8, however, the runs-on section is optional and you need to have your own runner and "labels" setup (see Bitbucket runners). If not specified, the pipeline will run on the default Bitbucket hosted agent.
It is also worth mentioning that the image specified in image: atlassian/default-image:4 comes with pre-installed binaries such as jq and curl. See Bitbucket pipelines Docker images reference for more details: https://support.atlassian.com/bitbucket-cloud/docs/use-docker-images-as-build-environments/
Example screenshot of a pull request created by the shell script using the custom pipeline:

Bitbucket pipelines documentation: https://support.atlassian.com/bitbucket-cloud/docs/get-started-with-bitbucket-pipelines/
5. Test the Bitbucket pipeline with manual runs
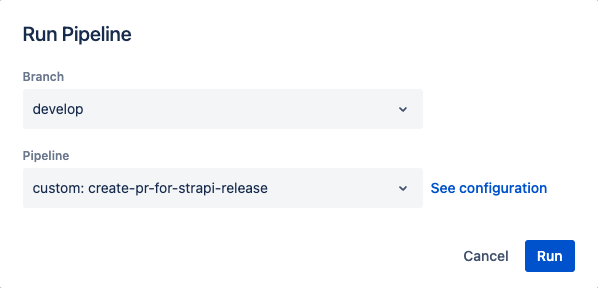
To test your custom Bitbucket pipeline, you can first push the updated bitbucket-pipelines.yml and create-pr-for-strapi-release.sh script to a new branch. Then, on the Bitbucket repository web interface, navigate to "Pipelines" and click "Run pipeline" in the upper right corner. In the modal that appears, select the branch containing your changes and the custom pipeline you want to run. Finally, press the "Run" button:
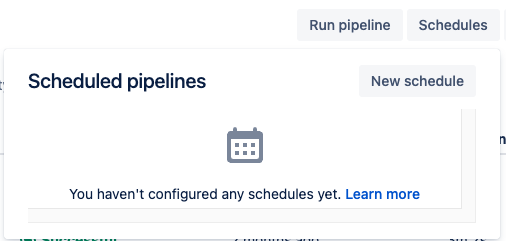
6. Create a Bitbucket pipeline schedule
As a final step, we will create a pipeline that runs on a specified schedule. To do this, navigate to the Bitbucket repository web interface, click on "Pipelines", and then in the upper-right corner, click on "Schedules". A modal will appear displaying a list of schedules, if any exist. Click on "New schedule" to create a new schedule:
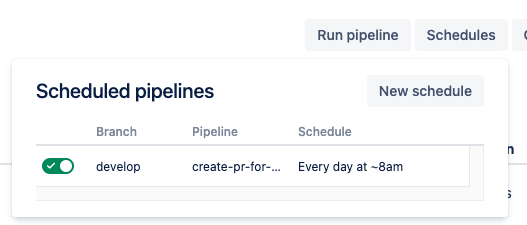
A new modal will appear, allowing you to configure the branch, pipeline, and frequency. Finally, click the "Create" button to complete the process.
By revisiting the "Schedules" section in the "Pipeline" overview, you should now be able to see the pipeline schedule that you have configured:
How to create a Bitbucket pipeline schedule: https://support.atlassian.com/bitbucket-cloud/docs/pipeline-triggers/#On-schedule
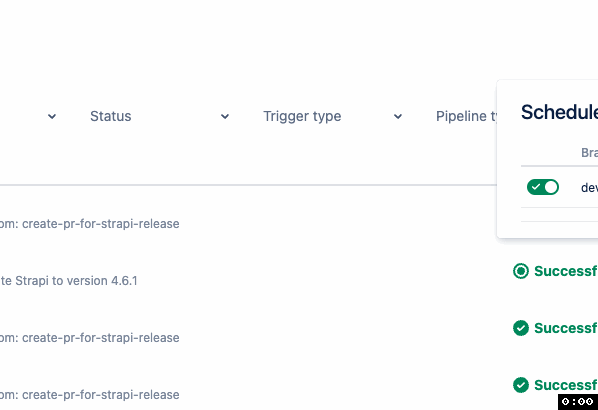
Final results: Example pipeline runs and pull request
The execution of the pipeline schedule and its output can be viewed in the next screenshots:

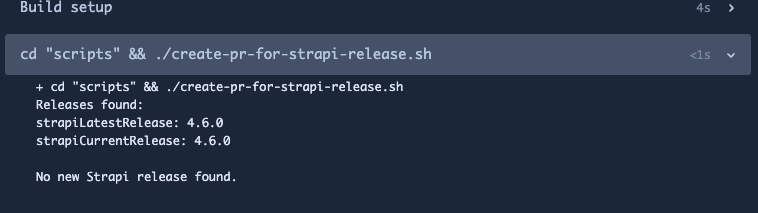
No new Strapi version
Output of the pipeline when no new Strapi version is found:
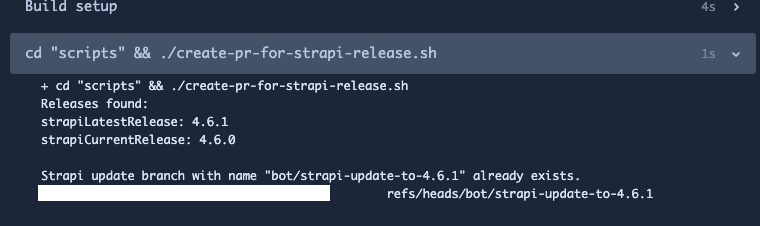
Branch already exists
Output of the pipeline when a branch with the new Strapi version already exists:
New Strapi version & pull request created
Output of the pipeline when a new Strapi version is discovered and a pull request has been successfully generated:
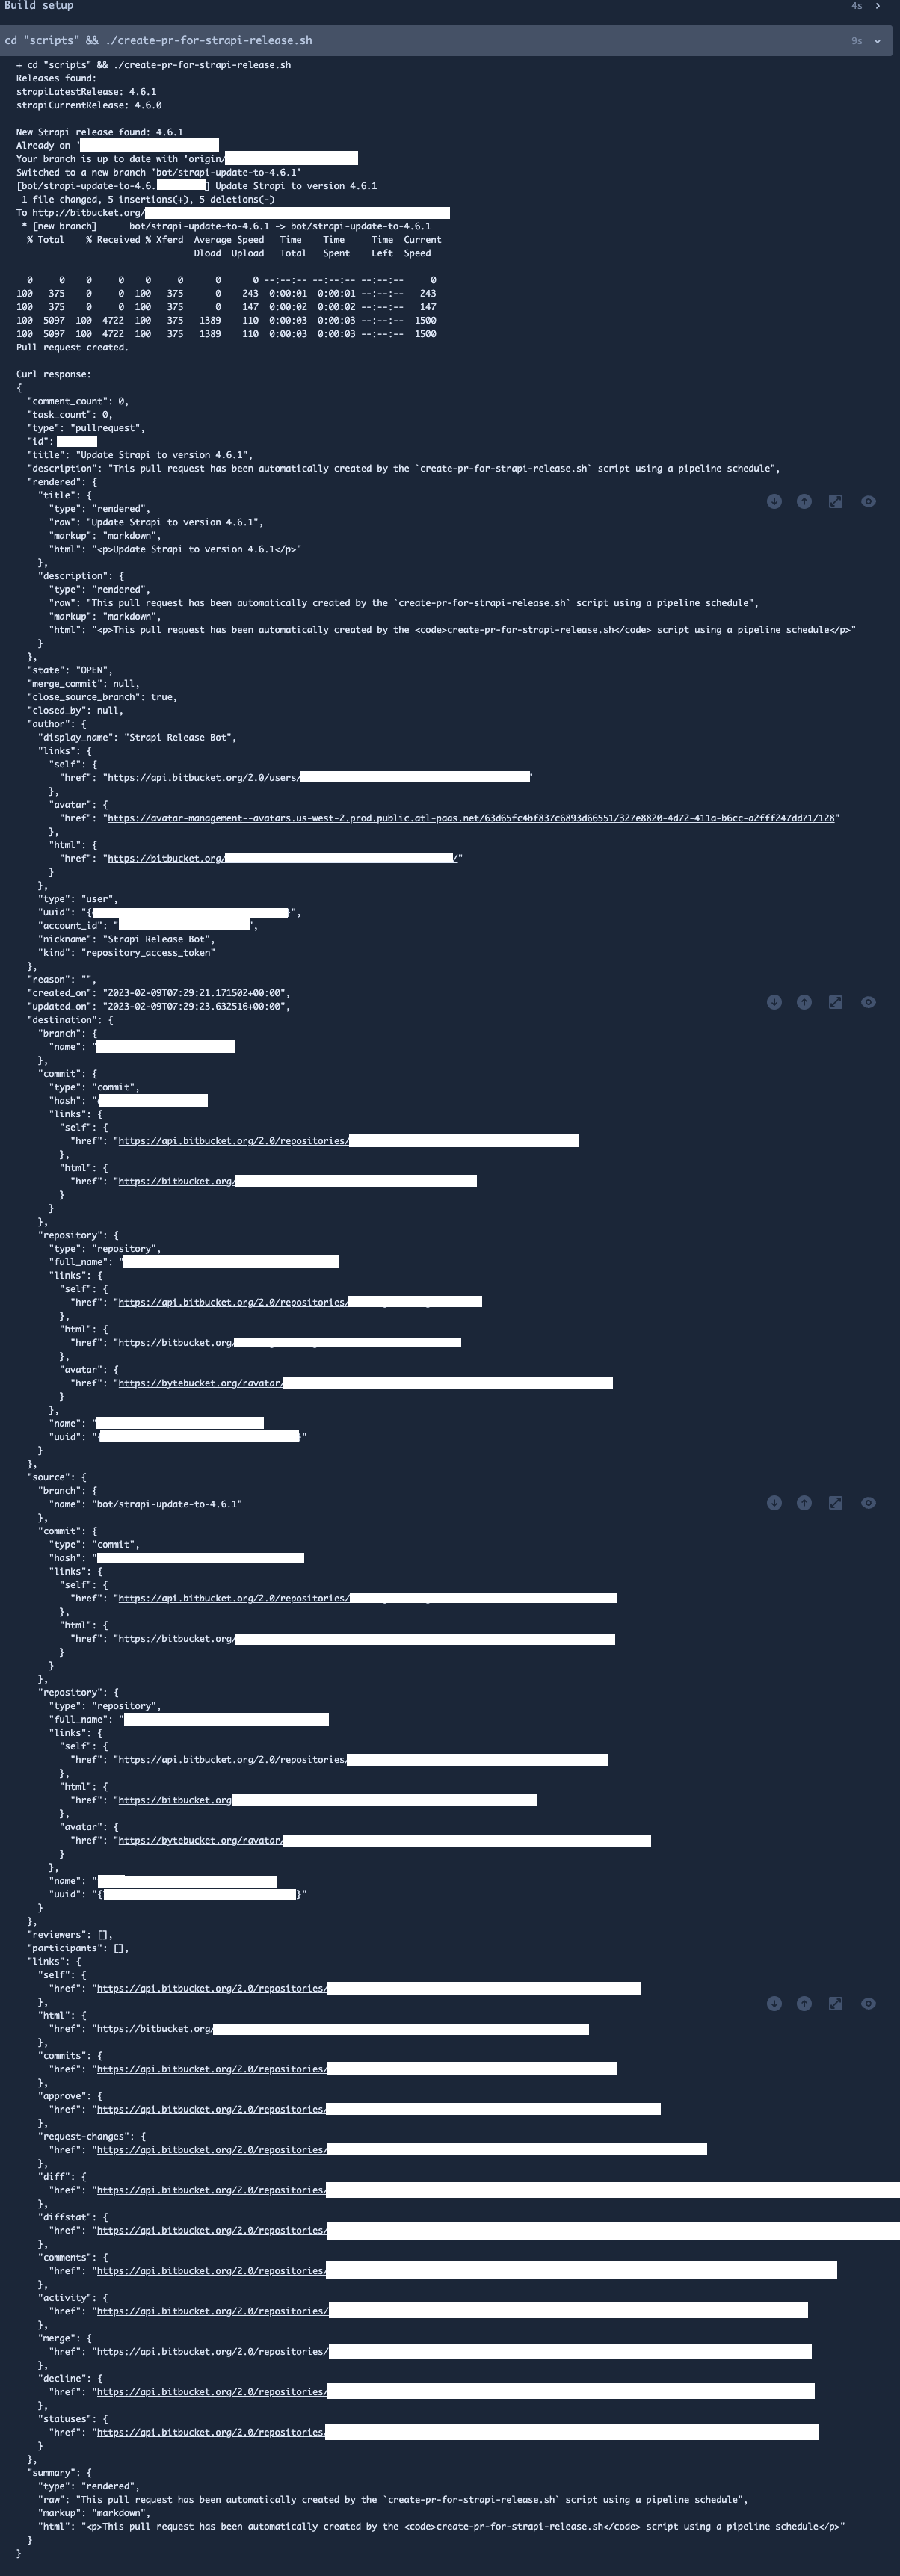
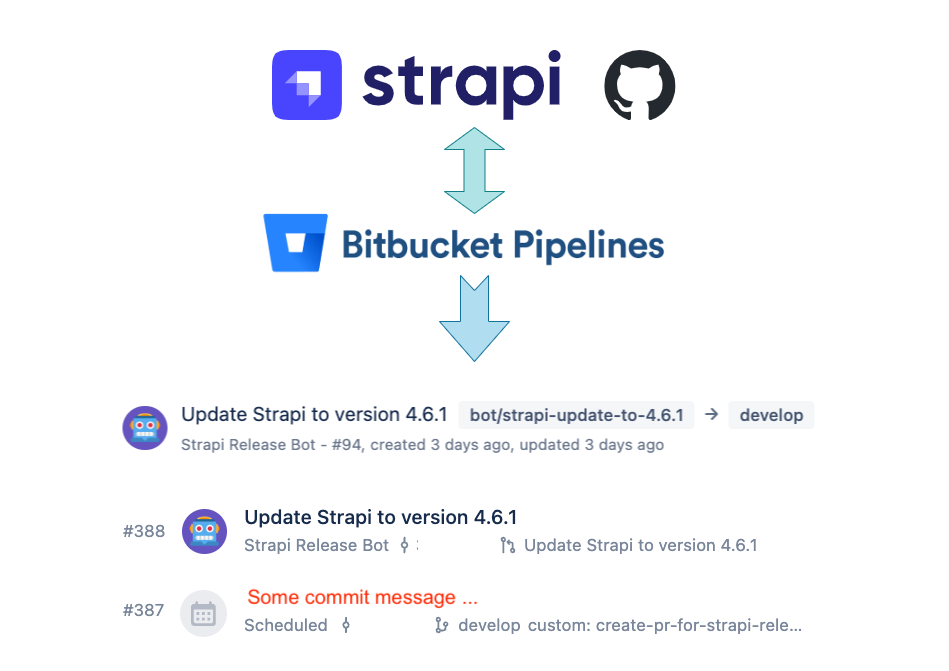
Overview of the scheduled Bitbucket pipeline runs and resulting pull request for a new Strapi version 4.6.1:

4.6.1
4.6.1Conclusion
In conclusion, automating the process of pull request creation for new Strapi releases on Bitbucket is possible with the use of a scheduled pipeline. The steps involved include generating an access token with the necessary permissions, storing the access token as a repository variable, writing a shell script to compare versions and create a pull request using the Bitbucket API, defining a custom pipeline, testing the pipeline with manual runs, and setting up a schedule for the pipeline. With these steps in place, you can now confidently upgrade to the latest version of Strapi, knowing that your backend customizations are tested and functioning as expected. This process saves time and provides peace of mind, making the upgrade process smoother and more efficient.
References & links
Script gist
- Github "gist" link to the shell script:
https://gist.github.com/22phuber/195e6929324e0490eacb3e039f25fad1
Strapi
Bitbucket
- Bitbucket Pipelines: https://support.atlassian.com/bitbucket-cloud/docs/get-started-with-bitbucket-pipelines/
- Access Tokens: https://support.atlassian.com/bitbucket-cloud/docs/using-access-tokens/
- Repository Variable & Secrets: https://support.atlassian.com/bitbucket-cloud/docs/variables-and-secrets/
- Pipeline Trigger on-schedule: https://support.atlassian.com/bitbucket-cloud/docs/pipeline-triggers/#On-schedule
- Bitbucket Runners: https://support.atlassian.com/bitbucket-cloud/docs/runners/
- Docker images: https://support.atlassian.com/bitbucket-cloud/docs/use-docker-images-as-build-environments/